Engineering and Optimizing a Mobile Restaurant Menu
Posted on |
You've heard about menu engineering, but what about digital menu optimization? Follow these steps to drive revenue, and increase average ticket size.
Your menu is more than a list of food – it’s your best marketing asset. A properly formatted and optimized digital menu goes a long way in driving sales and revenue. Traditional menu engineering (to a physical menu) has been proven to increase revenue by 15%. But what about a digital menu? We’re very optimistic when it comes to optimizing or engineering your digital menu for revenue. Here are some of our best tips and practices to get the most out of your restaurant’s digital menu.
Add Images
Adding images to your digital menu is the easiest and most effective way to showcase your food and drinks.
Adding images can help guide your guests and set expectations for their meal, but they can also help justify prices. A study by Grubhub concluded that adding “professionally taken” photos to your page can boost sales by 30%. Don’t stress the “professional” part, any image is better than no image and Smartphone cameras have come a long way. Here’s an article on how to take professional food photos with your phone.
In addition, a customer is more likely to order from an app or website that includes photo’s of every dish. Photo-based menus on an online platform can increase restaurants conversion rates by 25% compared to to text menus. This is another reason you should have your OrderUp menu posted online and across platforms. It can greatly improve your ability to attract more customers who are browsing for food online.
Finally, items that have images next to them have an average increase of 6.5% in sales, compared to those without.
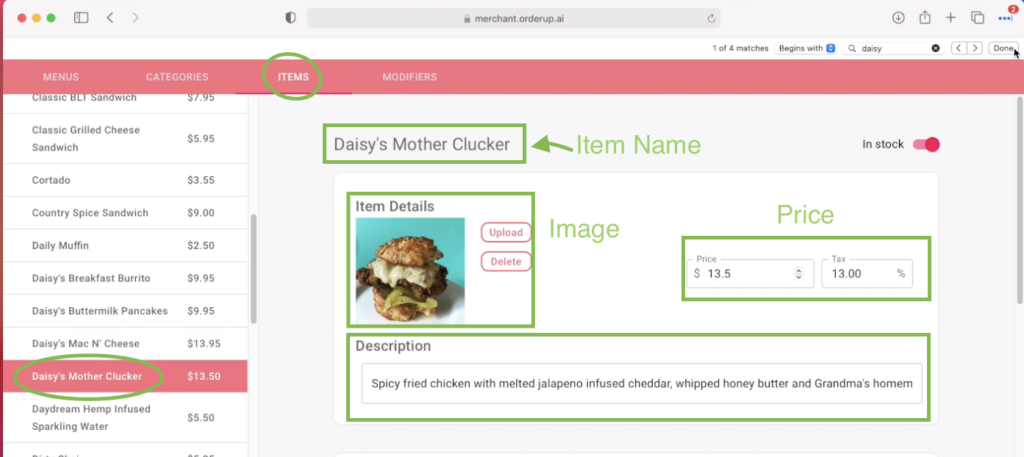
How to add images to your OrderUp Digital Menu:
First, you’ll need to log in to your Menu Builder Application.
- Click the items bar at the top of the page
- Click the item you wish to add an image to from the left-hand side
- Click upload, and choose the image you wish to display with that item
Item Descriptions
Strong menu item descriptions can take a dish from being just a food item. It can incite emotional responses, and help guide the diner through an experience. This not only differentiates your item from competitors but can also be used to justify the pricing.
Storytelling
In one experiment, someone bought various small items, and asked 100 creative writers to invent stories about the items, which would then be posted on eBay. The cost of the goods totalled $128.74, and ended up selling for a net profit of $3,612.51.
The takeaway? People like stories, and it sparks an emotional connection to the item, beyond the food itself. They’re buying the dish, but they’re also buying the story and experience behind the dish.
Maybe you have a Secret Sauce that’s been in the family for years – elaborate on that. Any chance you have to tell a story, do it.
Food Source
The description area is also a great place to let your diners know the source of your food. A study showed that American’s are willing to pay 36% more for items that are sustainably sourced. Let your guests know where their food is coming from, it’s a win-win scenario (in most cases…)
Emoji’s
You can also add emojis to either the name or description of an item to give further visual representation of the dish, and help guests with dietary restrictions find items that fit their needs. Some examples are:
- Vegan/Vegetarian: 🌱
- Spicy 🌶
- Eco-Friendly/Minimal Waste ♻️
Adjectives and Descriptive Words
Lastly, when describing an item, try to use as many adjectives or descriptive words are possible. See below, for example:
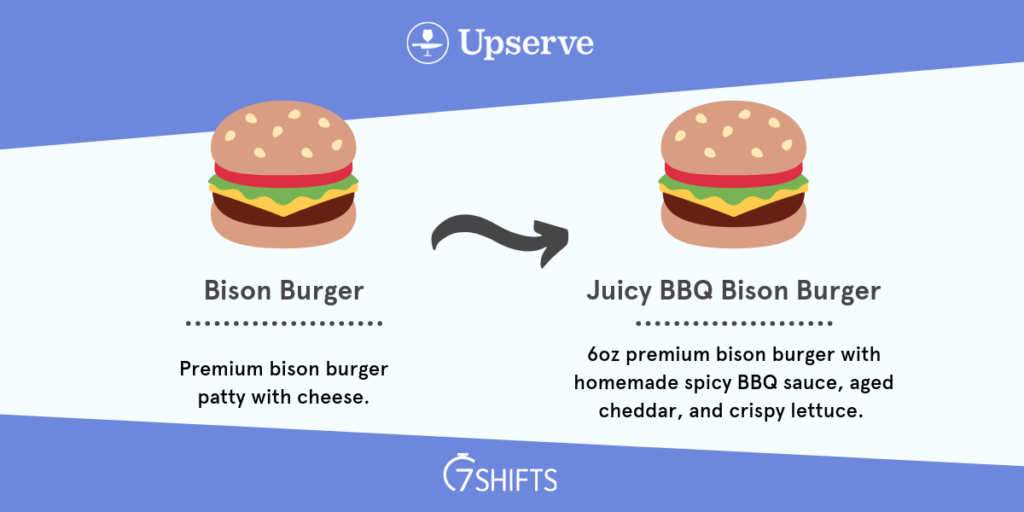
Notice the use of different adjectives to describe not only the taste of the item but also the texture of the toppings. Some other tips are to include the method of preparation and being careful with descriptive words and their perceived connotation.
Texture: Matching the right texture words to your dishes helps your guests to imagine what it will be like to eat your food before they order it.
Taste: Give your guests an idea of what type of taste they can expect from an item or drink
Method of Preparation: One of the best ways to describe food on your menu is by indicating how it was prepared. As long as your customer recognizes the words you choose, it will give them a clear picture of your food’s flavor and appearance.
Words with a positive connotation: The easiest way to accidentally influence your customers into passing over a menu item is to use a word with a negative connotation. Before you put a word in your menu description, take a moment to think about how that word is commonly used. Does it bring a positive image to mind, or is it unappetizing? Additionally, the positive alternatives to negative words are often more specific, so they give your customers a more precise idea of what your food is like.
An example would be burnt vs. blackened:
Blackened Salmon? Count me in!
Burnt Salmon? I’ll pass.
For your convenience, we’ve made a document highlighting some of the best words to use when describing food items. (There’s too many to include in this post..) Use it for inspiration as you add descriptions or name your items! [there’s no form or download necessary]
Menu Description Word Inspiration
How to add descriptions to your items:
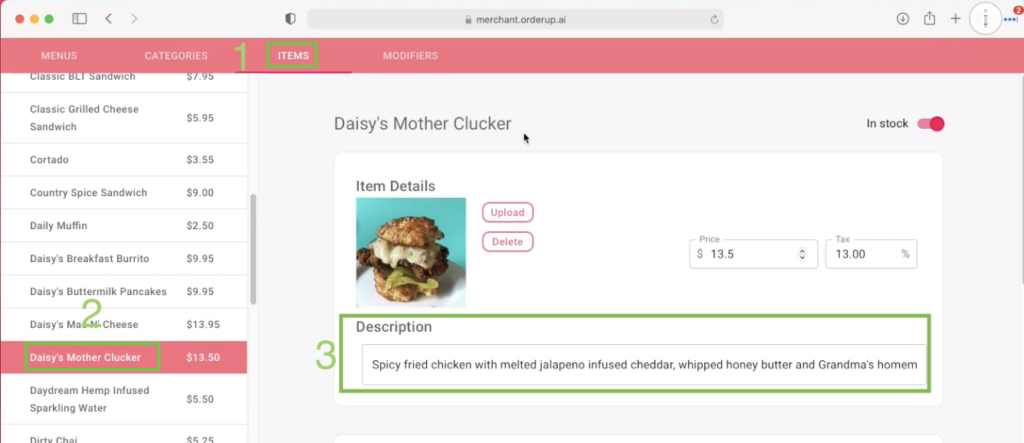
Log into your OrderUp Digital Menu Builder
- Click the Items Tab in the top navigation
- Find the item you wish to add or change the description for
- Click the description, and enter your text
The great part about using an OrderUp digital menu is that you’re in complete control. No more worrying about wording and printing menus – you have the power to change, update and test different item names and descriptions in real-time.
Modifiers & Add-Ons
Modifiers and suggested add-ons represent a HUGE opportunity to boost average ticket size. We already know that contactless ordering and payment can increase the average ticket size by 14%. We believe that this is the low end. Strategically placing, naming and pricing can (and will) prove to be a major driver in revenue.
If you need a refresher on Modifiers and Modifier Groups – See if we can clear any of that up either in this video or in this post.
Modifiers, add ons, whatever you want to call them – they’re proven to increase revenue. In fact, nearly 35% of Amazon’s eCommerce revenue comes from “Suggested For You” items, or “Customers who buy this item, also by some other item”. Following that same logic, there’s an ample amount of opportunities on your menu to do the same.
Add-Ons
Add-Ons refers to any extra modifiers, that come with a cost. It’s a good idea to have enough add-on options, but not too many. Studies suggest that 7 is the magic number when it comes to Items in a specific category, this would be the same for a modifier or modifier group. Here are some suggestions for Modifier Groups and the Modifiers (add-ons) inside them. Don’t forget to use descriptive words as you’re naming your modifier items as well!
Let’s take the “6oz Smoke House Cheeseburger“.
This specific Burger can be located on any given menu, but you’ll want to create modifier groups and items to appear anywhere that the burger does. In this case, we’d have 2 modifier groups and a total of 7 modifier items. For the sake of this example, we’re assuming all burgers come with fries, and there’s only one choice of bun, and one choice of cheese.
Item: 60z Smoke House Cheeseburger
Item Description:
This 6oz, freshly ground chuck beef burger comes standard with crispy lettuce, sharp American cheese and Fresh Organic Tomatoes. Cooked to perfection with a toasted brioche bun and comes with our signature fresh cut fries.
Modifier Group: Burgers Add-Ons
Modifier Items:
- Add Extra 6oz. Patty (+$5.50)
- Add Smoked Bacon (+$1.00)
- Add Extra Sharp American Cheese (+$1.00)
- Add Fried Jalepeneo’s ($.50)
Modifier Items:
- Local Ceasar Salad (+$2.00)
- Crispy Sweet Potato Fries, with Chipotle Aoili (+$1.50)
- Triple Loaded Baked Potato (+$2.00)
Suggested Pairings
Let’s say your restaurant offers a 12oz Ribeye Steak on the dinner menu. Everyone knows that steak pairs well with red wine, but may not know which one to pick, and thus they settle for just a glass of whatever’s cheapest.
Use modifier groups and items to suggest specific pairings. Not only does this give you the opportunity to boost the check size, but it’s also supports the diner experience by suggesting the best possible drink.
Add a modifier group “Sommelier Suggestion” (just a suggestion) and list the wines (by the glass or by the bottle) as an option while the guest is confirming their order.
For example:
Item: 12oz Texas Ribeye
Item Description: AAAA 12oz Premium Ribeye from the HK Cattle Ranch. Seared on a charcoal grill, cooked medium-rare. Served with caramelized onion, mushroom, and a red wine jus.
Modifier Group: Sommellier Suggested – 12oz Ribeye
Modifier Group Items:
- Beringer Vineyards Knights Valley Reserve Cabernet Sauvignon, Sonoma County, USA ($90/bottle)
- Beringer Vineyards Knights Valley Reserve Cabernet Sauvignon, Sonoma County, USA ($15/6oz)
Modifier Group: Steak Add-Ons
Modifier Items:
- Caramelized Onion & Mushroom (+$2)
- Blue Cheese Crumble (+$3)
- Extra Au Just (+$2)
Of course, every menu and restaurant is different, and how you decide to handle modifiers and add-ons is completely up to you. Regardless, we suggest you play around with modifier groups and test different combinations. This can be replicated with Coffee and a Donut, or Chicken Wings and Beers.
How to add or edit modifier groups & items:
First, you’ll want to create Modifier Groups:
- Log into the Menu Builder Application
- Navigate to the “Modifier” tab at the top
- Either create a new modifier group with the green button at the bottom left, or edit an existing one.
- Modifier Items can be added by clicking the “Create Modifier” in the Items box
- Names and prices can be changed by clicking the Item Modifier itself, or you can create new ones.
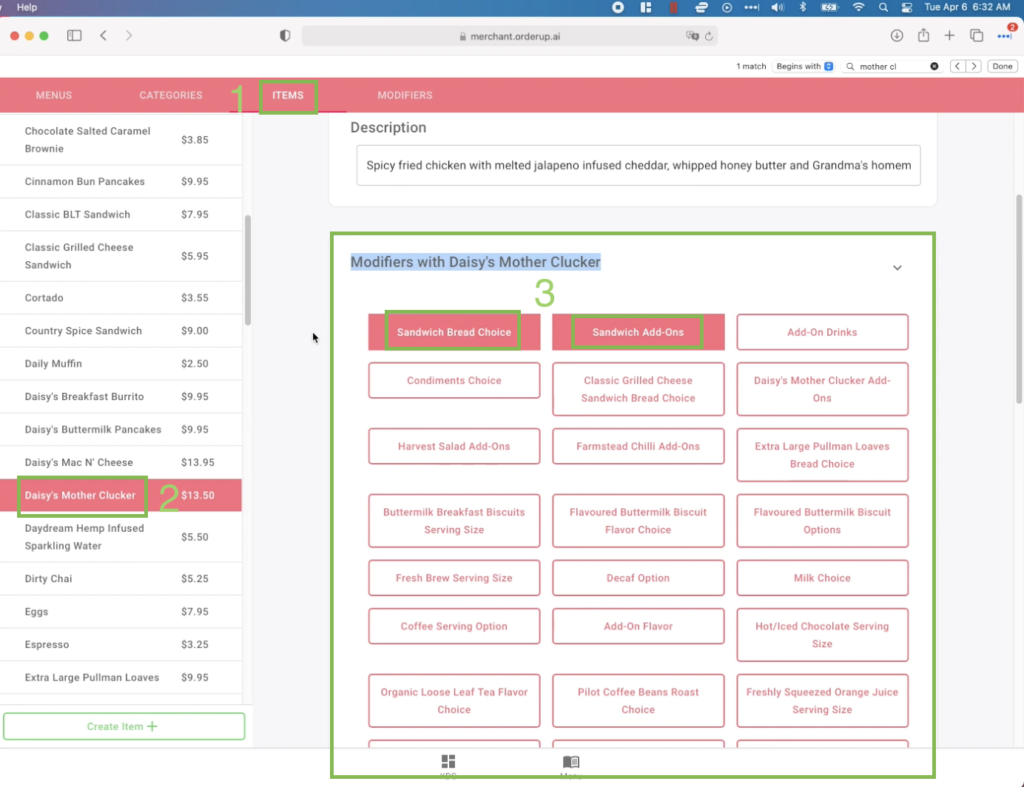
How to Associate Modifier Groups with Items:
- Click the “Items Tab” at the top
- Find the desired item, click it
- Towards the bottom, find the modifier group that you wish to associate it with, click it. (see image below)
For more information, please visit our Menu Builder Tutorial Post – Modifier Section.
Find Your Stars & Dogs.
This is a simple tool to categories menu items based on their profitability. For this example, follow the Boston Consulting Groups Growth-Share Matrix. It consists of Stars, Question Marks, Cash Cows, and Dogs. It can help prioritize menu items, and provide opportunities and insights into your menu. Stars are your menu items that generate the most revenue and have a high sales volume. Question marks may not generate as much revenue but are still popular. Cash Cows have high margins but aren’t as popular as they could be. Dogs are the most unpopular items that don’t generate much revenue and might cost you in either food waste, prep time, or viable price.
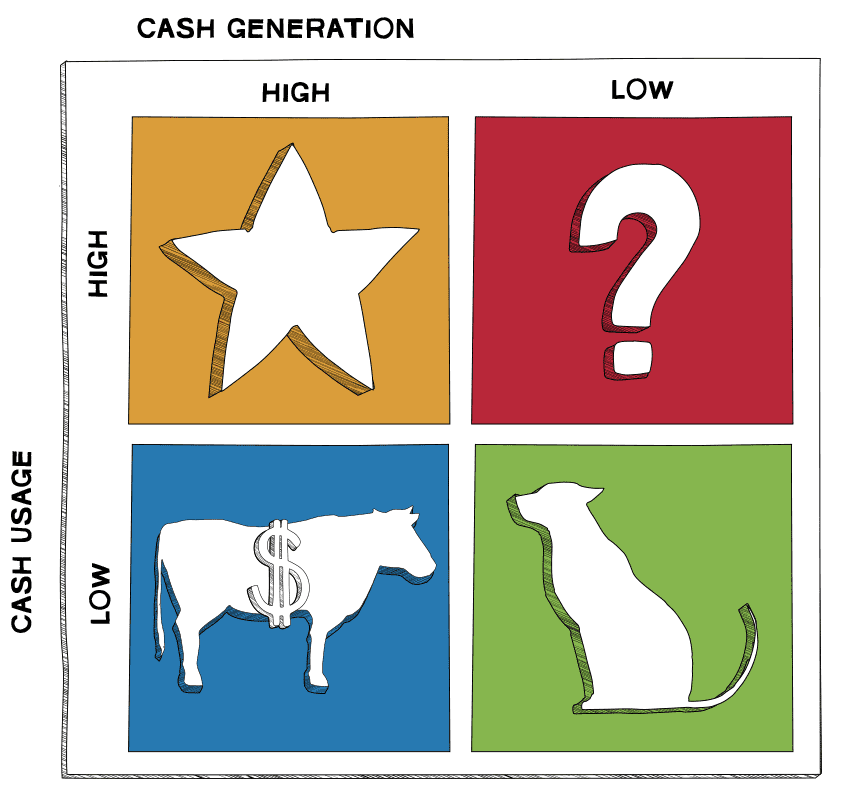
Stars: Your most profitable, and popular dish. This drives significant amount of your food sales and contributes to your bottom line. Note, you can have multiple of these, and it’s suggested that you find the “Star” items, drinks and add-ons.
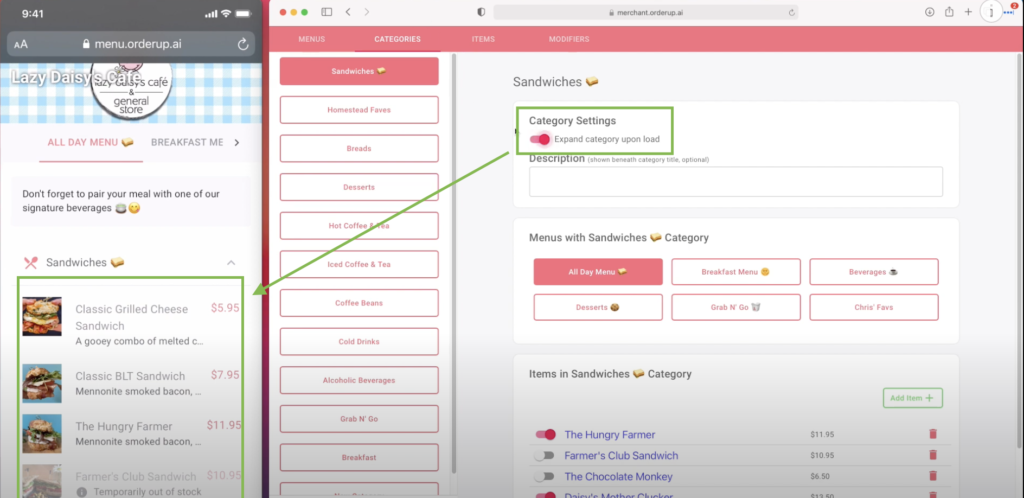
Recommendations: Stars should be visible, and located where your guests will see it the most. It’s your star! Consider finding your star item for every category that you have in your menu, and just place it first. Also, Consider using the Menu Expand feature in the menu builder so this item is front and center.
Question Marks: These items may be unique, and help get people through the door. It might be highly popular and have a high sales volume, but at the end of the day, it’s just not as profitable.
Recommendation: There’s a couple of options here:
A) See if you can reduce the input costs surrounding the item. If there’s a way to do so without losing quality – go for it.
B) Experiment with pricing – find the price elasticity of demand. Perhaps a small price increase will still be worth it. Changing item prices is very simple and can be updated in real-time, on the fly in OrderUp’s Menu Builder.
C) Let it be. You’ve mastered the art of this dish, and it’s priced exactly at the level your customers are willing to pay. Find opportunities to drive revenue elsewhere.
Cash Cow: These are the items that don’t cost you much, but still have high profitability. What’s missing is the sales volume to drive revenue. These dishes may be the most exciting opportunities for your menu. You know the profit is there, but how can you get people to buy it and increase the sales volume?
Recommendation: TEST! Test everything around this dish in the menu builder. When testing changes on your menu, the easiest way is to set a base number of sales. Make a change to one or more properties. Check to see if sales volume over the same time-span (1 week, 1 month,) is greater or worse than your base.
- Change the image
- Change where the item appears in a category: Put it at the top, and see if that has an effect on sales.=.
- Change the Name: Get creative, add an emoji, use descriptive words.
- Change the Description: Try to tell a story, change up the descriptive words.
- Change the Price: You know this item can make you money. Run a test to see if lowering the price, and thus your margin, will drive sales volume that equals more than the previous price point.
- Add it to a deal: Pair it with a drink special!
Dogs: These dishes are not very profitable, and not very popular. But, like your own dog.. maybe you love it. Maybe a select amount of people love it. At the end of the day, it’s your choice what to do with this item.
Recommendation: If you love this dish and can’t live without it, test it like a cash cow. Try different imagery, names description to see if you can boost that sales volume. Or, if it’s costing you more than it’s making you – you may want to think about removing it entirely.
As we continue to build out our Menu Builder Application for our partner merchants more opportunities will arise to help drive revenue, increase guest satisfaction and support operational efficiency. If you have any questions surrounding menu building, best practices or are looking for more insight – please don’t hesitate to reach out to [email protected]