fbpx

Product Updates – July 2022

OrderUp Product Updates for July 2022

Hello! It’s been a busy and exciting month for our team and our restaurant partners. We’re super excited about some of the new features and product improvements we’ve made during July. Please see below to follow along. 

New Menu Client

Our engineering team has engaged in a complete back-end & front end upgrade of our digital menu. This new menu is not only faster and more reliable, but it solves some past existing bugs. 

We’re very excited to release this menu as it will act as the base for more frequent updates & features. 

Please see the video below for a quick video demo.


User Authentication – Merchant Management

Managers and operators are now able to set up users & passwords with specific permissions.

These permissions can include: 

  • Making menu changes
  • Changing item pricing
  • Viewing and generating reports
  • Creating new users and choosing their permission level

How to edit or add user permissions:

  1. Log into your OrderUp merchant account
  2. Navigate to the “people” tab at the bottom left of the screen, above the “settings” gear icon
  3. Edit existing users or add a new user
  4. Choose the permissions this user should have
  5. Set the Pin
  6. Click “Save”
When someone is trying to access reporting or make menu changes, they will need to enter in their PIN to gain access.
 
See the video below for an example of creating a new user.

Chit Improvements – Timestamps

We’ve added an extra time stamp to our chits so staff can be aware of exactly what time a guest has sat down, and what time a specific item was ordered. This adds a level of certainty to wait times and overall time at a table.

Receipt Improvements

Along with our chits, we’ve also updated our physical and digital receipts. They all reference:

  • Time of payment
  • Stripe ID 
  • Payment ID
  • Order Number
  • Guest Name
  • Refunded Items
Printed receipt example

Set Menus as Active or Inactive

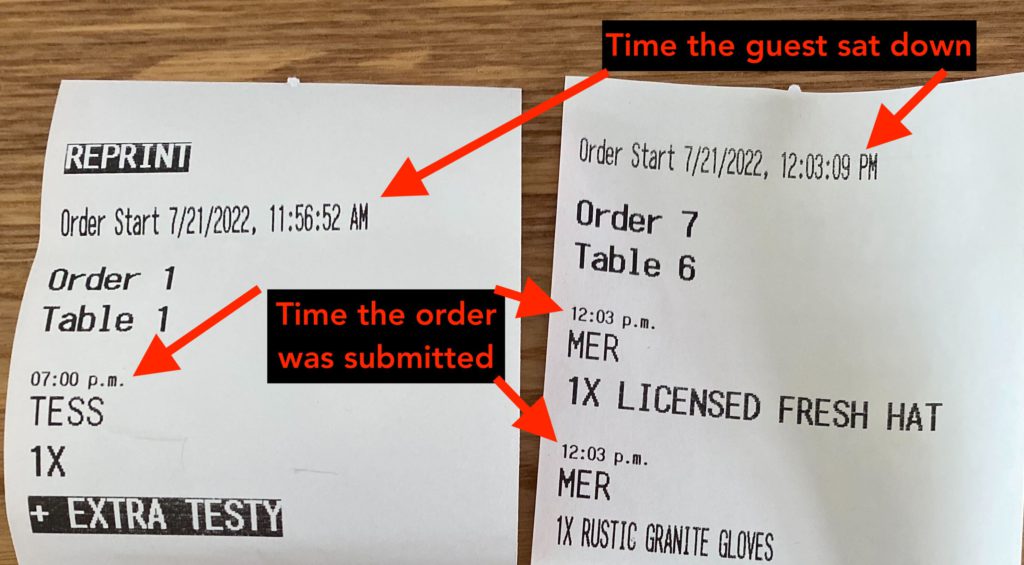
Full menus can be set to active or inactive with the toggle of a button. When active, it will follow the menus availability time. When set to inactive, it will override menu availability times. 

In general, we suggest leaving this as “Active”, and using the “Inactive” as you need it. For example, you sold out of every item in a menu, but do not want to mark each individual item as out of stock or change the menu availability times. 

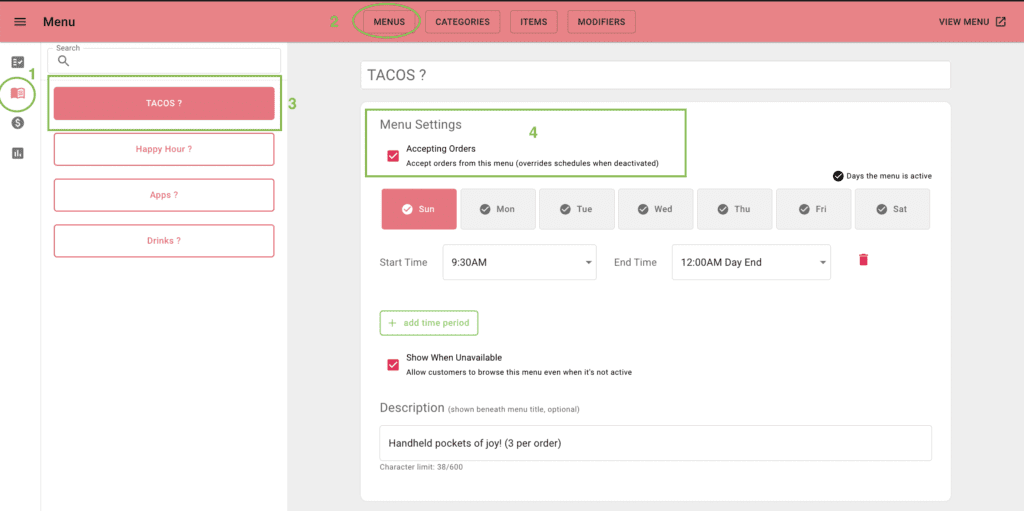
How to mark menus as active or inactive:

  1. Navigate to the Menu Tab on the left hand side of the Menu builder in your merchant account
  2. Ensure you have selected “MENUS” at the top 
  3. Select the menu that you wish to edit
  4. Toggle the “Accepting Orders” box
Scroll to Top